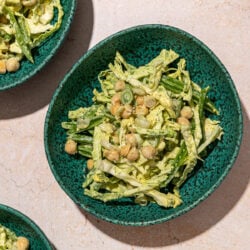
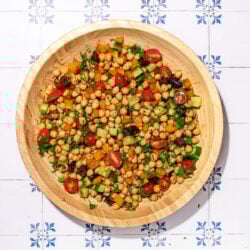
21+ Healthy Vegan Chickpea Recipes
Do you love chickpeas as much as I love chickpeas? I’ve got more than 21 delicious vegan chickpea recipes featuring the most versatile of all the legumes. Whether you’re looking for snacks, main dishes, salads, or even desserts (!!!), there’s something here for you. Each of these plant-based recipes are easy to make and full of flavour.
Move over cauliflower…I’m pretty sure that chickpeas win the award for the most versatile plant food around. Chickpeas can make dips, snacks, a really good tuna dupe as well as lovely soups, salads and even pasta. Yep, this dietitian cannot get enough of chickpea pasta, but only if it’s Banza which sadly you can’t really get in Canada and it’s been waaaaaaaay too long since I could pack a suitcase with American grocery goodies.
Chickpeas (or garbanzo beans if that’s how you roll) might also win the award for the bean most loved by those who don’t consider themselves bean lovers. Like kids. And carnivores. So if you’re trying to eat more plants, or trying to up your intake of gut-loving fibre, you’re gonna need more chickpea recipes in your life.
I’m also sharing a few chickpea tips and tricks so here’s a handy table of contents so you can skip ahead:
- Are Canned Chickpeas Healthy?
- How to Cook Chickpeas from Scratch
- How to Freeze Chickpeas
- Are Chickpeas Low FODMAP?
- 21+ Healthy Vegan Chickpea Recipes
Are Canned Chickpeas Healthy?
Canned chickpeas are a fantastic fast food. They’re affordable, last forever in the pantry so you always have a plant-based protein at the ready, and pack plenty of nutrition. The fibre, protein, and minerals we find in chickpeas are heat- and processing-stable so chickpeas don’t really lose any nutrition in the canning process.
When buying canned chickpeas, my only advice is to look for no-salt-added varieties. Why? Well, I find that they don’t really add that much flavour to a dish so I still have to salt my recipe to taste. So, why not get salt free versions so I can keep the sodium down?
How to Cook Chickpeas from Scratch
Now, as great as canned chickpeas are, I do find the flavour and texture of home-cooked chickpeas to be superior. So if you’re really into beans, you might want to cook from scratch! With the amount of cooking I do, I find that I use 50:50 canned/homecooked.
It can be even more economical to buy dried beans at the supermarket, but I also like to splash out a bit on really good quality dried ones, like Flourist or Rancho Gordo.
Here’s how to cook ‘em from scratch… but first things first: if you’re going to cook chickpeas from scratch, don’t make tiny amounts! I’ll cook ½ or 1 pound (225g – 450g) of dried chickpeas in one go and then freeze them so they don’t go bad. I’ve got instructions on how to do this below:
- Soak dried chickpeas for 24 hours in a large pot with plenty of water. Keep it on the counter or back of the stove, with lid slightly ajar. Well soaked beans mean less tummy trouble.
- Drain soaked beans, rinse, and fill up pot with fresh water so that beans are covered by 3 inches of water. Why waste that water? To remove the water-soluble FODMAPs that will give you a ton of gas.
- Cook beans, without salt, until tender but not mushy. Depending on the variety and age of the chickpea, this could be anywhere from 45 – 90 minutes. After 30 minutes, set a timer to check every 15 minutes for doneness.
- Rinse, drain and store whatever you’ll use in the next 4-5 days in the refrigerator with fresh water.
How to Freeze Chickpeas
Yep, you read that right: you can freeze cooked chickpeas. And if you’re cooking them from scratch, you want to! I cook up big batches of chickpeas on the weekend, before I need them, and then freeze them so they’re as convenient as canned beans.
Once you’ve cooked your chickpeas, spread them out on a large, parchment-lined, rimmed baking sheet until they come to room temperature. Then, pop them in the freezer for an hour until they start to harden. You can then transfer them to large freezer bags until ready to use.
To use, just pop them into soups and stews as is. Or, if using in salads, or for chickpea tuna, measure into a mesh strainer and let thaw until ready to use.
Are Chickpeas Low FODMAP?
Chickpeas are a higher FODMAP food…but in certain forms and serving sizes, they’re actually low FODMAP! What is this magic circumstance? You can eat ½ cup of canned chickpeas if they’re really well rinsed and drained. That’s a decent serving size. In fact, there are actually a lot of vegan foods that are low FODMAP in smaller servings so you don’t need to worry about staying nourished if you’re plant-based and on a low FODMAP elimination for IBS.
21+ Healthy Vegan Chickpea Recipes
Want more chickpea goodness in your life? Try these healthy vegan chickpea recipes that feature either chickpeas or chickpea flour — which you can make by simply popping dried chickpeas into your blender!
Easy Protein-Packed Chickpea Scramble
Vegan Breakfast Sandwich with Chickpea Flour Eggs
Peanut Butter Banana Chickpea Shake (5 Ingredients!)
Love and Lemons’ BEST Humus
Crispy Roasted Chickpeas with Everything Bagel Spice
Vegan Buffalo Chickpea Quesadillas
Spicy Kimchi Tacos with Smashed Chickpea
Prep Ahead Crunchy Cauliflower Chickpea Tacos
5-Minute Vegan Chickpea Tuna
Lemon Orzo Pasta Salad
Easy Vegan Pasta Salad
Braised Harissa Eggplant Chickpeas
Easy Chickpea Coconut Milk Curry with Broccoli
1-Pot Chickpea Noodle Soup
Green Goddess Bowls with Farro & Pepita Lime Sauce
Broccoli Rabe and Chive Pesto Orecchiette with Sunflower “Parm” & Smoky Chickpeas
Spicy Vegetables and Chickpeas with Pasta
Homemade Vegan Pot Pie Recipe
Chickpea Burger
Chocolate Chip Chickpea Blondies
Vegan 7 Cup Burfi: Chickpea Flour & Coconut Fudge
21+ Vegan Chickpea Recipes: Chickpea Tomato Tartines
Ingredients
- 4 cups cherry tomatoes, halved, about 2 pints
- 2 tablespoons extra virgin olive oil
- 3 inch sprig of rosemary, leaves removed
- 4 cloves garlic, still in their skin
- freshly cracked pepper
- 2 x 14 oz can of chickpeas, drained and rinsed
- ¼ cup freshly squeezed lemon juice, divided
- ¾ teaspoon salt*, plus more for seasoning
- ¼ teaspoon chili flakes
For serving
- 1 loaf crusty sourdough bread, or your fave gluten free loaf
- vegan mayo
Instructions
- Preheat oven to 400 degrees. Prepare a rimmed baking sheet with a piece of parchment paper.
- In a medium-sized bowl, toss tomatoes with olive oil, rosemary, and garlic cloves. Pour onto rimmed baking sheet, ensuring tomatoes are evenly spaced. Season with salt and pepper.
- Roast tomato/rosemary/garlic clove mixture for 30-35 minutes, depending on how large they are (less time for smaller tomatoes).
- In a food processor, add the chickpeas, salt, chile flakes, and 2 tbsp (30 mL) of lemon juice. Once roasted and cooled, carefully squeeze out the contents of the garlic cloves into the chickpea mix, then pulse until chickpeas are roughly broken up and starting to stick together a bit. (You can also do this with with a fork in a bowl.) Taste, and check the texture. Add more lemon juice to as desired.
- Slice 6 large pieces from your loaf and toast them. (Hint: to up the ante, grill your bread on the BBQ.) Slather with vegan mayo and a generous scoop of the smashed chickpeas. With a fork, spread chickpea mash evenly across bread. Top with a scoop (about 1/6th) of the roasted rosemary tomatoes.
- Enjoy!
10 Comments on “21+ Healthy Vegan Chickpea Recipes”
Sign me uppp for your challenge either one will l♥️Healthy eating.. please sign me up… enjoy your vacation ♥️
Hey Bea, keep an eye on the newsletter, the link will be in there SOON!
Desiree
Awesome can’t wait…♥️
Hi Desiree!
My family and I are a huge fan of your recipes and your expertise in nutrition in case you don’t know already! 🙂 Since this post is all about chickpeas, I wanted to share with anyone reading this post you guys need to try the chickpea gnocchi with olive tomato sauce in Desiree’s “ Eat More Plants…” cookbook! 10 stars- ⭐️⭐️⭐️⭐️⭐️⭐️⭐️⭐️⭐️⭐️ from me, Jordanna, and my family tonight!!!
The olive- tomato sauce was to die for! It had such fresh, yummy flavors and was so easy to make and we felt the taste was so much better than all of the jarred sauces you can buy! The dough ( Make sure the chickpeas are thoroughly dried with a towel before putting them in the food processor to keep the dough dry and of a thick consistency), sauce, and cooking the gnocchi were easy to make! Desiree thank you so much for the great explanation and tips you shared in your chickpea gnocchi video!
However, creating the gnocchi with the dough was very tricky for me. I called my mom from the kitchen, “MOM, I NEED YOUR HELP NOW PLEASE!” She said, “ I’m coming sweet heart!” 💕 Thank goodness for mom’s! 🙂 I learned some cool tricks from my mom that were extremely helpful. I am urging folks if you can hang in there with my mom’s below tips in case you have never made homemade dough before like me, this recipe will definitely be a favorite! If you are an expert in making homemade dough like Desiree, you probably already know these tips or may know different, equally effective tips: ( These below tips were not shown on your chickpea gnocchi video, Desiree, which is why I needed my mom’s help!)
1) After quartering the dough like Desiree shows in the chickpea gnocchi video, before you take the dough out of the food processor, put chickpea flour on your hands and all over your counter to prevent the dough from sticking either on your hands or the counter.
2) Lay the quarter of dough on your counter and knead each quarter 5 times with your hands. The purpose of kneading is to get more flour into the dough section so it won’t stick. You knead by folding half of the dough section up into itself and then pushing down with your knuckles or hands to flatten the dough. You can fold the dough half into itself with the dough facing lengthwise or crosswise. After you knead the dough once, lift it up to a different place on your counter that is covered in flour and repeat above. If you don’t do this last step, your dough will stick to your counter. Wherever you knead the dough, be sure the counter is covered in flour underneath to prevent the dough from sticking.
3) Take a pastry cutter to throw out any sticky, raw clumps of dough that are left over on the counter before proceeding. If you don’t do this discarding, your dough will stick to the counter on these left-over flour bits and you may have trouble with the next step. After discarding any dough clumps, pour lots more chickpea flour on any spaces on your counter that have no more chickpea flour.
4) Once enough flour has been kneaded into the dough, form it into a horizontal log with your hands. If there are any parts of the log that are thicker, roll the log of dough forwards and backwards with your hands to thin out. Remember to roll the dough all the way forwards or up on all of your hand and backwards or all the way down on your hands. Your log of dough should be moving a long way forwards and backwards on your counter 2 to 3 times for this step. Make sure there is always flour wherever you roll the dough with your hands.
5) Use a pastry cutter or knife to cut the dough into little gnocchis following Desiree’s dimensions in video or cookbook.
6) If there are cracks in the little, individual gnocchis that look like they will come apart, my mom taught me to put little drops of water right on the cracks and then push each exterior side of the gnocchi in to create more volume or height. Putting just enough drops of water on the cracks and then pushing each side of the gnocchi in will tightly seal the cracks. The cracks mean there is excess flour on the dough.
Desiree, you are a genius! Usually gnocchi made of potato is very bland. However, your gnocchis made from chickpeas, chickpea flour, and other ingredients were extremely flavorful! Your homemade sauce brought the recipe over the moon! We loved this recipe so much! 🤗🥰
Okay, I think we ALL need a tutorial from your mom Jordanna!! Thank you for your kind words 🙂
Hi Desiree!
I made the chickpea tomato tartine recipe with soup this weekend and the flavors of this toast were absolutely to die for! I mean, come on! What could be more wonderful than roasted garlic, cherry tomatoes, EVOO, and fresh rosemary? Absolute match made in Heaven! If using Ezekiel bread, because that brand of bread is so small, this recipe made 9 toasts for us on that bread! So nice to get so many left-overs! 😛
I made a few changes to the execution. It took a longer time to make with my changes. First, I roasted the whole garlic cloves in EVOO with skin peeled for 275 degrees F for 1 hour wrapped in aluminum foil. From personal experimentation, I wanted the lowest temperature possible to fully roast the garlic. When people are pressed for time, my way probably is not realistic to make! Cooking is my favorite hobby so I don’t mind playing with ingredients for a long time.
The last 30 minutes of that 1 hour, I added the grape tomatoes and fresh rosemary. The grape tomatoes were juicy, warm, soft, and whole/original size instead of shriveled. I know this texture difference is a personal preference and both ways are probably great.
I highly recommend folks to try this recipe! The scrumptious flavors seriously blew my mind and we can’t wait to make this recipe again! 🤗
Jordanna
Hey Jordanna, so glad you made this one!!! How was that slow roasted garlic?!? Sounds SO good.
Oh, and 1 more little thing! When I added the roasted garlic to the chickpeas, I also took 1 large spoonful of the roasted cherry tomato, rosemary, and oil mixture to blitz up with the chickpeas, salt, red pepper flakes, and 2 TBSP. of lemon juice. I did this because I wanted to intensify the flavor of the chickpea mixture because the topping on the toast was sssssssooooo incredible! The roasted mixture we used in the chickpea mixture as well as a topping! I added 2 more TBSP. of lemon juice (kept your 1/4 cup total) and EVOO to thin out the chickpea mixture into a paste in our food processor. Finally, I loaded the vegan mayo on the bottom of the bread, chickpea mixture second, and roasted cherry tomato mixture third and we were in complete ecstasy with our first bite! 😛😛😛
Hello Desiree! 🙂
To answer your question, I have literally tried roasting garlic every week for the past 2 months starting at 375 degrees F and decreasing by 25 degrees F until I couldn’t go any lower within an hour. Even I do not have patience to wait longer than an hour! With my Maytag brand of oven, I can go as low as 275 degrees F for an hour. The garlic is very light brown but primarily pale yellow, soft and mushy when pierced with a fork, and very sweet. The best part is the incredible scent that permeates my home. Love it! ❤️🙂
LOVE it! Such a scientific approach 🙂